To grow microgreens at home, sow seeds densely on a 4–5 cm layer of moist soil or a soilless mat, cover the tray for a 3–4 day blackout, then move it under bright light. Mist once or twice a day, keep the room around 18–22 °C, and harvest with scissors in 7 to 21 days.
I grew my first tray of microgreens on a windowsill during an Estonian winter, mostly because I was tired of paying supermarket prices for a few limp sprigs of green. Ten days later I was cutting handfuls of peppery radish shoots for almost nothing. After more than a decade of indoor growing, microgreens are still the crop I recommend to anyone who thinks they cannot keep a plant alive. They are fast, forgiving, and they reward you in under three weeks. This guide walks through every step from choosing seeds to cutting your first harvest, and it covers the small mistakes that trip most beginners up.
What microgreens actually are
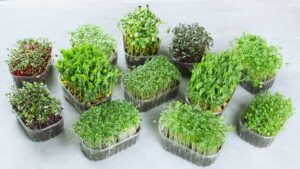
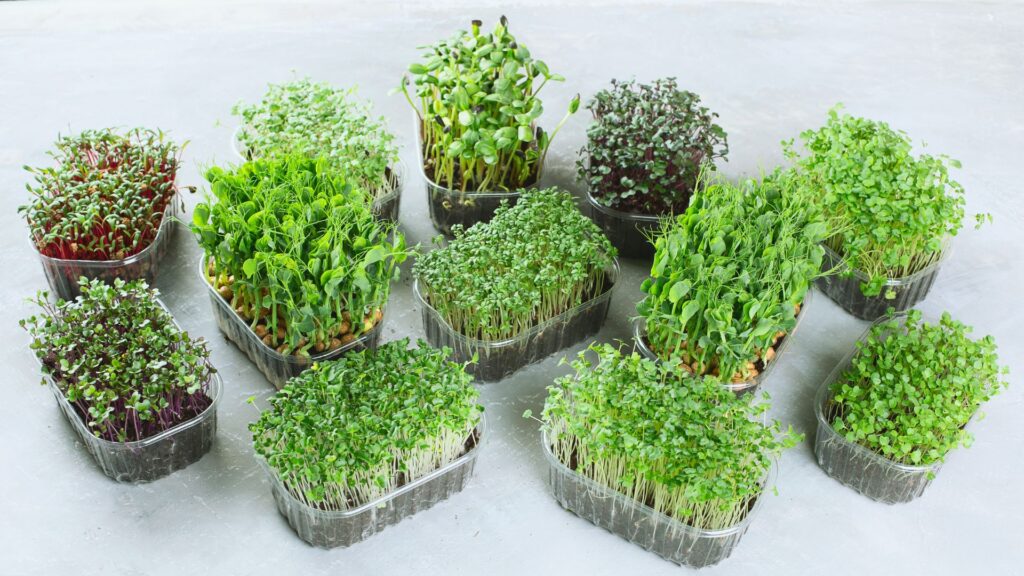
A microgreen is a young vegetable or herb seedling harvested just after its first true leaves begin to form, usually when the plant is 2.5–7.5 cm tall. You eat the whole thing above the soil line, stem and leaves together, while the flavour is at its most concentrated. Almost any edible leafy plant can be grown this way, which is why a single windowsill can give you radish, pea, broccoli, sunflower, mustard and basil shoots through the whole year.
People often confuse microgreens with sprouts, and the difference matters for both flavour and safety. Sprouts are germinated seeds eaten root and all after two to four days, grown in water without light or soil, which makes them prone to bacteria. Microgreens grow in a medium under light for one to three weeks, you cut them above the medium, and you never eat the root or the seed husk. Baby greens are the next stage up again, harvested at three to five weeks once the leaves are larger. If you want the full comparison, my colleagues cover it in our beginner guide to growing microgreens indoors.
The nutrition is the part that surprised me most. A 2012 study by the University of Maryland and the USDA tested 25 varieties and found microgreens carried four to 40 times more nutrients by weight than the mature versions of the same plants, including vitamins C, E and K. You are not growing a garnish. You are growing one of the most nutrient-dense foods you can produce at home.
What you need to grow microgreens at home
The kit for microgreens is refreshingly short, and most of it you already own. The essentials are a shallow tray, a growing medium, seeds, water in a mister, and light. A tray 3–5 cm deep with drainage holes is ideal, paired with a second solid tray underneath to catch water and to use as a blackout cover. A takeaway container with holes poked in the base works perfectly well for your first try, so there is no reason to spend money before you know you enjoy it.
For the growing medium you have three sensible choices. A fine, peat-free seed compost gives the most reliable results and holds moisture evenly. Coconut coir is clean, light and re-wets easily, which I prefer for indoor use. Soilless mats made of hemp or jute are the tidiest option and the best route if the idea of soil on your kitchen counter puts you off. Whichever you pick, you want a layer roughly 2.5–4 cm thick, firmed down flat so the seeds sit on an even surface.
Light is the one area where beginners overthink things. A bright south-facing windowsill will grow a decent tray in summer, but Northern European winters give too few daylight hours, and the shoots stretch and flop. A simple LED grow light running 12–16 hours a day fixes that completely and keeps your greens compact and richly coloured. You do not need a powerful setup for a crop this short, and our range of microgreen seeds pairs well with even an entry-level panel.
Best microgreens for beginners
Not all microgreens behave the same way, and a poor first choice is the quickest path to giving up. I always steer beginners toward the large, fast seeds that germinate evenly and forgive uneven watering. The table below shows the varieties I hand to first-timers, with realistic timings from a room at 18–22 °C.
| Microgreen | Days to harvest | Flavour | Pre-soak seeds | Difficulty |
|---|---|---|---|---|
| Radish | 7–10 | Peppery, sharp | No | Very easy |
| Pea shoots | 10–14 | Sweet, fresh | Yes, 8–12 h | Very easy |
| Sunflower | 8–12 | Nutty, crunchy | Yes, 8–12 h | Easy |
| Broccoli | 8–12 | Mild, fresh | No | Easy |
| Mustard | 8–12 | Hot, mustardy | No | Easy |
| Basil | 12–18 | Aromatic, sweet | No | Moderate |
If I had to pick two to start with, they would be radish and pea. Radish germinates in two to three days and is almost impossible to ruin, which builds confidence fast. Pea shoots give a generous, sweet harvest and even regrow a small second cut. You can buy both as dedicated trays of radish seeds and pea seeds, and a single 30 × 20 cm tray of either is enough to top salads for a week.
How to grow microgreens step by step
The whole process from seed to harvest follows the same seven steps no matter which variety you choose. I have grown hundreds of trays this way, and the routine takes about ten minutes of hands-on time spread across two to three weeks.
- Prepare the tray. Fill it with 2.5–4 cm of moist medium and press the surface flat with your hand or a small board. An even surface is the single biggest factor in even germination.
- Soak large seeds. Pea, sunflower and other big seeds benefit from 8–12 hours in water before sowing. Small seeds like radish, broccoli and mustard go straight onto the medium dry.
- Sow densely. Scatter seeds so they almost touch but do not overlap. A typical 30 × 20 cm tray takes 30–40 g of pea or sunflower, or 10–15 g of small seeds. Microgreens are crowded on purpose, which is the opposite of normal sowing.
- Mist and cover. Spray the seeds well, then cover the tray with a second tray or a lid to create darkness. This blackout period of 3–4 days encourages strong, uniform stems as the shoots reach for light.
- Mist daily in the dark. Lift the cover once a day, mist lightly so the surface never dries out, and replace it. You will see roots anchoring and pale yellow shoots rising.
- Uncover and give light. Once shoots are 2–4 cm tall and lifting the cover, remove it for good and place the tray under a grow light or in your brightest window. The pale shoots green up within hours.
- Water from below and grow on. For the remaining days, add a little water to the bottom tray rather than misting the leaves, which keeps foliage dry and discourages mould. Harvest when the first true leaves appear.
That is the entire cycle. The hardest part is resisting the urge to peek too often during the blackout days, because every time you flood the tray with light early you risk weak, leggy stems. Penn State Extension lays out a similar routine in its step-by-step microgreens guide, and the consistency across sources tells you how reliable the method is.
Light, water and temperature
Temperature is the quiet driver behind how fast and how evenly your tray grows. Microgreens germinate best with a medium around 15–24 °C and an air temperature of 15–21 °C, which is comfortably within the range of a normal heated room. Too cold and germination drags out past a week, which gives mould more time to take hold. Too warm, above roughly 26 °C, and the seeds can rot before they sprout.
Water is where most failures happen, almost always from too much rather than too little. During the blackout days a light daily misting keeps the surface damp without waterlogging it. After uncovering, switch to bottom-watering by pouring 50–100 ml into the lower tray and letting the medium wick it up over ten minutes, then tipping away anything that has not absorbed. Standing water and constantly wet leaves are the two conditions mould loves, so dry foliage and a draining base solve most problems before they start.
Once the cover comes off, light controls colour, flavour and how upright the shoots stand. Aim for 12–16 hours a day. Shoots grown in weak light stretch tall and pale and taste watery, while the same variety under a good grow light stays short, deeply coloured and far more flavourful. In an Estonian or Baltic winter, supplemental light is not a luxury for microgreens, it is the difference between a crop and a failure.
How to harvest and store microgreens
Harvesting is the satisfying part, and the timing is generous rather than precise. Most microgreens are ready 7 to 21 days after sowing, once the two seed leaves have opened and the first true leaves are just emerging. Radish can be ready in 7 days, sunflower and broccoli around 10, and slower herbs like basil closer to 18. Hold a small bunch gently and cut the stems with clean scissors about 1 cm above the medium, leaving the roots and any seed husks behind.
Most microgreens are a single-cut crop and do not regrow meaningfully, so I sow a fresh tray every few days to keep a steady supply rather than waiting for a regrowth that never really comes. Pea shoots are the main exception and will give a smaller second cut if you leave the lower stem intact. For the freshest flavour, cut only what you will eat that day.
For storage, harvest when the leaves are dry, never straight after watering. Pat them gently if needed, then keep them in a sealed container lined with a dry paper towel in the fridge, where they hold for 2 to 5 days. Washing before storage shortens that window because trapped moisture brings on slime, so I wash only at the moment of eating. The short shelf life is exactly why growing at home beats buying, since a supermarket punnet has often already used up half its life in transit.
Common problems and how to fix them
Almost every microgreen problem traces back to one of three causes, and each has a quick fix. The most common is mould, a fuzzy white or grey growth that beginners often mistake for healthy root hairs. True root hairs are fine, white and only around the roots, and they vanish when misted. Mould is fuzzy, spreads across the medium and smells musty. It comes from too much moisture, poor airflow and overcrowding, so the cure is bottom-watering, dry leaves, a little air movement from a small fan, and slightly thinner sowing next time.
Leggy, pale shoots that flop over are the second classic issue, caused by too little light after the blackout. Move the tray under a grow light running 12–16 hours and the next sowing will stand up properly. Patchy, uneven germination is the third, and it usually means the seed was sown unevenly, the surface was bumpy, or the tray dried out during the blackout. A flat, firmed surface, even seeding and consistent misting fix it. Across all three, the pattern is the same, with moisture control and light doing most of the heavy lifting.
Are microgreens worth growing
For the time and money involved, few crops give back as much. A tray costs little once you have seeds and reusable equipment, it occupies under half a square metre, and it turns around a harvest in one to three weeks all year. Set against the 4 to 40 times higher nutrient density that the Maryland and USDA researchers measured, and the short two to five day shelf life that makes shop-bought microgreens poor value, growing your own is an easy decision. They are also the gentlest possible introduction to indoor growing, which is why I point new gardeners here before anything else. Once you have cut a few trays, the jump to herbs, salads and a full smart garden feels natural.
Frequently asked questions
How long do microgreens take to grow?
Most microgreens are ready 7 to 21 days after sowing. Fast varieties like radish can be harvested in 7 to 10 days, while slower herbs such as basil take up to 18 days. Germination itself usually happens within 2 to 3 days.
Do I need a grow light for microgreens?
In summer a bright south-facing window can be enough, but in Northern Europe winter daylight is too weak and shoots stretch and flop. A simple LED grow light run 12 to 16 hours a day keeps them compact and well coloured, so it is strongly recommended from autumn to spring.
Can I grow microgreens without soil?
Yes. Soilless mats made of hemp, jute or coconut coir work very well and keep your kitchen clean. They hold moisture, support the roots, and let you bottom-water easily, which makes them a popular choice for indoor growing.
Why are my microgreens going mouldy?
Mould is almost always caused by too much moisture, poor airflow or sowing the seeds too thickly. Switch to bottom-watering so the leaves stay dry, add gentle air movement from a small fan, and sow slightly less densely. Do not confuse fuzzy mould with the fine white root hairs that disappear when misted.
Do microgreens regrow after you cut them?
Most do not regrow in any useful way and are a single-cut crop, so sow a fresh tray every few days for a steady supply. Pea shoots are the main exception and can give a smaller second harvest if you leave the lower stem intact when cutting.
Are microgreens healthier than full-grown vegetables?
By weight they are often far more nutrient-dense. A University of Maryland and USDA study of 25 varieties found 4 to 40 times more of certain nutrients, including vitamins C, E and K, than in the mature plants. You still eat them in small amounts, so they work best as a concentrated topping rather than a main vegetable.
Start your first tray
The best way to learn microgreens is to sow a tray today and watch it for two weeks, because the process teaches you far faster than any article can. Start with a forgiving variety, keep the leaves dry, give them good light, and you will be cutting your own greens before the month is out. When you are ready to begin, browse our full range of microgreen seeds and pick one or two fast growers to get going.