Hydroponic nutrients come in two-part A+B bottles (sometimes called Grow A and Grow B, or Micro and Bloom) that you mix into water at roughly 2–4 ml per litre, in that exact order, never combined in concentrated form. The A bottle holds calcium nitrate, the B bottle holds the phosphates and sulfates, and they are sold separately because mixing them at full strength causes the calcium and phosphate to react and drop out of solution as a chalky white sludge your plants cannot absorb.
I have run smart gardens and DIY deep-water culture buckets at home for years, and the single most common reason a first hydroponic crop fails is a nutrient mixing mistake — usually pouring both bottles into a measuring cup before they hit the water. This guide walks you through exactly how to mix hydroponic nutrients for the most common crops, the ml-per-litre numbers I use, and the three errors that wreck a fresh batch.
What hydroponic nutrients actually are
Soil contains a slow-release buffet of minerals that plant roots scavenge over weeks. Hydroponic nutrients replace that buffet with a measured liquid solution containing the 13 mineral elements plants need: nitrogen, phosphorus, potassium, calcium, magnesium, sulfur, iron, manganese, zinc, copper, boron, molybdenum, and chloride. Because everything is dissolved in water, the plant has instant access — which is why hydroponic plants typically grow faster than soil-grown ones. If you want the wider context, our explainer on what is hydroponics covers how the whole system works.
Almost every commercial product splits these elements into two concentrated bottles because calcium (in the A bottle) and phosphate plus sulfate (in the B bottle) will precipitate if combined at full strength. Once they are both diluted into a tank of water, the concentration is low enough that the reaction does not happen. That is the entire reason for the A+B split — not marketing, not “balance,” just chemistry.
The basic two-bottle mixing method
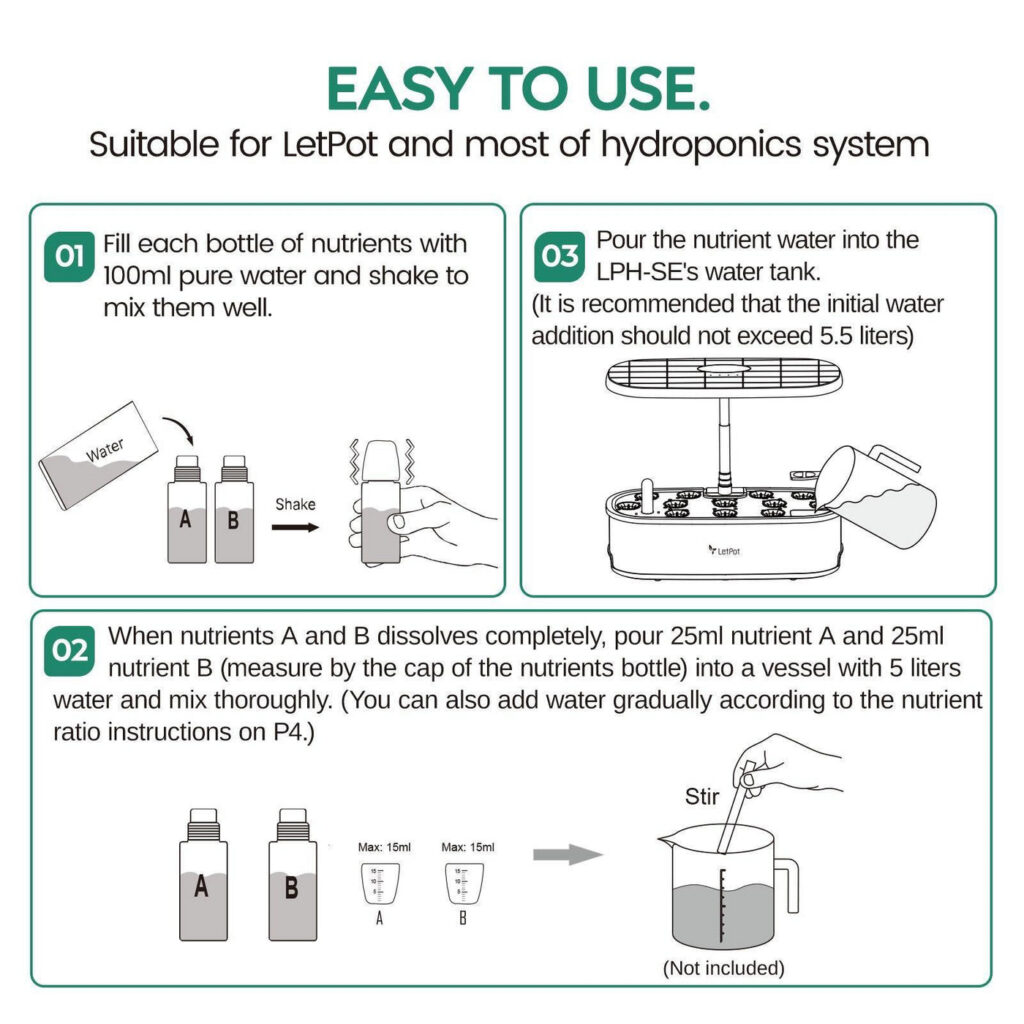
Here is the procedure I use for every batch, from a 1-litre jar up to a 20-litre reservoir:
- Start with the full volume of water at room temperature. Cold water (under 15 °C) slows nutrient uptake; hot water (over 25 °C) drops dissolved oxygen. Aim for 18–22 °C.
- Shake the A bottle, then pour bottle A into the water first. Use the dose your bottle specifies (commonly 2–4 ml per litre — see the table below).
- Stir for 10–15 seconds so the A solution is fully dispersed before B touches it.
- Shake the B bottle, then pour bottle B at the same dose. Stir again.
- Check pH with a meter or strip. Most crops want 5.5–6.5. Adjust with pH-down (phosphoric acid) or pH-up (potassium hydroxide) drop by drop.
- Check EC if you have a meter (more on EC values below). If it is too high, dilute with plain water; too low, add another small dose of A then B.
- Pour the finished solution into your reservoir or smart garden tank.
That is the entire mix. The order — water first, A second, stir, B third, stir — is non-negotiable. If you ever see a recipe telling you to combine A and B in a syringe before adding water, ignore it.
Ml-per-litre nutrient tables by crop
The numbers below are the doses I use with a typical balanced two-part hydroponic nutrient (something like General Hydroponics Flora Duo, Plagron Hydro A+B, or the LetPot and Botanium house nutrients sold in our fertilizers for hydroponics category). Always check the label on your specific bottle — concentrations vary by brand.
Leafy greens and herbs (low feeders)
| Crop | Bottle A (ml/L) | Bottle B (ml/L) | Target EC (mS/cm) | Target pH |
|---|---|---|---|---|
| Lettuce | 1.5 | 1.5 | 0.8–1.2 | 5.8–6.2 |
| Basil | 2.0 | 2.0 | 1.0–1.6 | 5.5–6.5 |
| Parsley | 2.0 | 2.0 | 1.0–1.4 | 5.5–6.5 |
| Mint | 1.5 | 1.5 | 0.8–1.2 | 5.5–6.5 |
| Coriander | 1.5 | 1.5 | 0.8–1.2 | 5.8–6.5 |
| Spinach | 2.0 | 2.0 | 1.2–1.8 | 6.0–6.5 |
| Microgreens | 1.0 | 1.0 | 0.4–0.8 | 5.8–6.2 |
Fruiting crops (heavy feeders)
| Crop | Bottle A (ml/L) seedling → fruit | Bottle B (ml/L) seedling → fruit | Target EC (mS/cm) | Target pH |
|---|---|---|---|---|
| Tomato | 2.0 → 4.0 | 2.0 → 4.0 | 2.0–3.5 | 5.8–6.3 |
| Cucumber | 2.0 → 3.5 | 2.0 → 3.5 | 1.8–2.8 | 5.8–6.0 |
| Pepper / chilli | 2.0 → 3.5 | 2.0 → 3.5 | 1.8–2.8 | 5.8–6.5 |
| Strawberry | 1.5 → 2.5 | 1.5 → 2.5 | 1.2–2.0 | 5.8–6.2 |
Start at the seedling end of the range, then ramp the dose up over four to six weeks as the plant builds leaf mass and starts flowering. If your tap water is hard (above 0.5 mS/cm starting EC), use the lower end of every range — your water already contributes some calcium and magnesium.
How EC and pH fit in
Two readings tell you whether the mix you just made is right: EC (electrical conductivity) measures how much fertiliser is dissolved in the water, and pH measures whether the solution is acid or alkaline enough for roots to actually absorb those minerals. Get EC wrong and you either starve the plant or burn the roots; get pH wrong and even a perfectly dosed solution becomes invisible to the root because key elements lock up and precipitate.
I check both every time I mix a fresh batch, and again every two or three days as the plants drink. For a deeper walkthrough including target ranges and how to top up between mixes, see our guide on what is EC in hydroponics. A combined pH/EC pen or two separate pens (sold in our testers and meters category) pays for itself within two crops because it stops you from throwing out reservoirs you could have rescued.
The 3 common mistakes that ruin a fresh batch
Mistake 1: Pouring A and B together before they hit the water
The classic beginner error. You measure out A in a 50 ml syringe, then squirt B into the same syringe, then add water. By the time the water gets there, calcium and phosphate have already reacted into insoluble calcium phosphate — that chalky white cloud at the bottom of the syringe. Your plants get a calcium-deficient, phosphate-deficient mix even though the bottle dose was correct. Fix: always pour A into the full water volume first, stir, then add B.
Mistake 2: Trusting the bottle dose without checking EC
Bottle labels assume zero-EC starting water (RO or distilled). My tap water in Tallinn starts at around 0.4 mS/cm before I add anything, which means the printed “4 ml per litre” dose can push the final EC past 3.0 and burn leafy-green roots. Fix: measure the EC of your raw water first, then dose to a target EC for the crop rather than a target ml-per-litre. If you do not own an EC meter yet, start at half the printed dose for leafy greens and full dose for fruiting crops, then adjust.
Mistake 3: Ignoring pH after adding nutrients
Most A+B nutrients are mildly acidic and drop the pH of your reservoir into the 5.0–5.5 range, sometimes lower. At pH 5.0, calcium and magnesium uptake collapse — you see classic deficiency symptoms (yellow new leaves, blossom-end rot on tomatoes) within a week. Fix: always check pH after mixing nutrients, not before, and bump it up to 5.8–6.2 with pH-up. Then re-check every two days because growing roots and topping up with plain water both shift it.
FAQ
How long does mixed hydroponic nutrient solution last?
In a covered, room-temperature reservoir, a freshly mixed batch stays usable for 7–14 days. After that, EC drifts as plants drink water faster than nutrients, pH wanders, and dissolved oxygen drops. I do a full reservoir swap every 10–14 days for fruiting crops and every 14 days for leafy greens.
Can I use one-part hydroponic nutrient instead of two-part?
Yes, single-part nutrients exist (sometimes labelled “all-in-one” or “complete”) and they work fine for low-EC leafy crops in smart gardens. The trade-off: the formulator had to choose between including calcium and including phosphate at concentration, so most one-parts skew lower in one of those. For heavy fruiting crops, a two-part system gives better results.
Do I need separate “grow” and “bloom” nutrients?
Not for most home growers. A balanced two-part A+B will carry lettuce, herbs, tomatoes, and peppers from seedling to harvest if you just bump the dose up as the plant gets bigger. Dedicated “bloom” formulas (higher P and K) help maximise tomato or pepper yield in a serious setup, but they are an optimisation, not a requirement.
What is the best NPK ratio for hydroponic vegetables?
For leafy greens, aim for roughly 3-1-2 N-P-K (more nitrogen than phosphorus and potassium). For fruiting crops in flower and fruit stage, shift toward 1-1-2 or even 1-1-3 — less nitrogen, more potassium. Most off-the-shelf A+B sets land somewhere in this range without you needing to do the math.
Can I use tap water for hydroponics?
In most of Estonia, yes, but let it sit uncovered overnight first so chlorine off-gasses. If your tap water is very hard (above 0.6 mS/cm raw EC), consider mixing 50/50 with RO or filtered water to give yourself more dosing headroom. Always measure your raw water EC before adding nutrients.
Sources
- University of Minnesota Extension — Small-scale hydroponics (extension.umn.edu)
- MDPI Foods peer-reviewed review on hydroponic nutrient solution composition and crop quality — Hydroponic Cultivation of Mentha (mdpi.com)